In the vast world of bread, where sourdough and rye frequently enough steal the spotlight, there lies a lesser-known marvel that has quietly captivated bakers and food enthusiasts alike: salt-rising bread. This rustic, golden loaf carries with it a rich tapestry of history and tradition, whispering stories of early American kitchens where yeast was scarce and resourcefulness reigned supreme. Unlike any other bread, salt-rising bread defies convention, relying not on yeast but on a unique bacterial fermentation that imparts a distinct aroma and flavor-a tangy, savory character that’s as intriguing as it is indeed tasty. Join us as we unlock the secrets of this singular bread, exploring it’s origins, its unusual fermentation process, and the timeless charm that continues to inspire those seeking to bake beyond the ordinary.
Unveiling the History and Craft of Salt Rising Bread
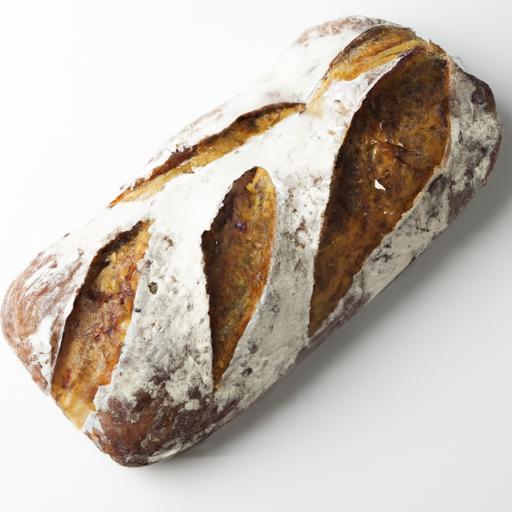
Salt rising bread is an enigmatic and fascinating loaf that has quietly captivated bakers and bread lovers alike for centuries. Originating in the Appalachian regions of the United States during the 1800s, its unique fermentation process set it apart from traditional yeast breads. Unlike typical yeast starters, salt rising bread relies on a wild bacterial fermentation that creates a tangy, rich flavor and an dense, tender crumb reminiscent of cornbread but with a distinctive tang and moist texture.
This bread evolved as a resourceful solution when yeast was scarce or expensive for rural families. Instead of yeast, these early bakers harnessed the power of the native bacteria found in milk, cornmeal, and warm environments-essentially using “wild” microbes to leaven the dough. The “salt rising” name is actually a clever misnomer since salt isn’t used to make the bread rise; it instead refers to the traditional method of incubating the starter in a warm, salted environment to encourage bacterial growth.
my first encounter with salt rising bread was at a local farmers’ market; its deep, almost custard-colored crumb and pungent aroma intrigued me. Experimenting in my kitchen, unlocking the secrets of this unique loaf became both a personal and culinary adventure.
Prep and Cook Time
- Preparation: 3 hours (including starter fermentation)
- Baking: 35 minutes
- Total: Approximately 3 hours 40 minutes
Yield
One medium loaf (about 12 slices)
Difficulty level
Medium – Requires attention to temperature and fermentation timing
Essential Ingredients
- 1 cup whole milk (preferably fresh and not ultra-pasteurized)
- ½ teaspoon baking soda
- ½ teaspoon granulated sugar
- 1 cup fine yellow cornmeal (not coarse grits)
- 2 cups all-purpose flour, sifted
- 1 teaspoon salt
- 1 tablespoon unsalted butter, melted (plus extra for greasing)
- 1 teaspoon baking powder
Step-by-Step Instructions
- Prepare the starter: In a small saucepan, gently warm the whole milk until it reaches about 110°F (warm but not hot). Remove from heat and whisk in the baking soda and sugar. Stir in the cornmeal until fully combined.
- Incubate the starter: Transfer the mixture to a clean glass or ceramic bowl, cover with a clean cloth or plastic wrap. Place in a warm spot (~85°F),such as inside a turned-off oven with the light on,for 8 to 12 hours or overnight. The starter will develop a strong,slightly pungent aroma and small bubbles-signals that the wild fermentation is successful.
- Check and activate the starter: After incubation, the starter may have a custard-like texture with small bubbles. If no bubbles appear or there is a foul smell,discard and start again. Once ready, stir the starter gently.
- Mix the dough: In a large bowl, combine the all-purpose flour, salt, and baking powder. Add the starter and melted butter. Stir with a wooden spoon until a sticky dough forms. Be careful not to overmix - a shaggy, sticky consistency is ideal.
- First rise: Cover the dough loosely and place in a warm area (75°F to 85°F) for 2 hours or until noticeably puffed. The texture should be soft but cohesive.
- Shape the loaf: Lightly flour a surface and carefully transfer the dough. Gently form it into a round or oval loaf without pressing out all of the air bubbles.
- Second rise: Place the shaped dough into a greased loaf pan or on a parchment-lined baking sheet. Cover and let rise again for 1 hour.
- Bake: Preheat the oven to 375°F. Bake the loaf for 30-35 minutes until golden brown and hollow-sounding when tapped. If the crust browns to quickly, tent with foil during the last 10 minutes.
- Cool and enjoy: allow the bread to cool completely on a wire rack before slicing to preserve the texture and flavor.
Tips for success: Mastering this Unique Loaf
- Temperature control is critical: The bacteria that ferment this bread thrive in consistently warm environments. Use an oven with the light on, a proofing box, or a warm water bath to maintain warmth.
- Starter aroma: Expect a strong smell somewhat resembling cheddar or mild sulfur-this is normal and signals a healthy starter.
- Use fresh,quality ingredients: Whole milk and freshly milled cornmeal preserve the authentic taste and texture.
- Patience pays off: Don’t rush the fermentation.Longer incubations frequently enough yield deeper flavor but watch for unpleasant odors indicating spoilage.
- Variations: Add herbs like rosemary or caraway seeds for aromatic twists,or swap a portion of the flour for whole wheat for a heartier loaf.
- Make-ahead: The dough can be refrigerated after the first rise. Bring to room temperature and allow a short second rise before baking.
Serving Suggestions
Salt rising bread shines best when served warm and fresh. Slather it with softened butter or a drizzle of local honey to complement its tangy, buttery crumb. It makes an excellent base for savory toppings-try it with sharp cheddar and garden-fresh tomatoes or a creamy avocado spread. Pair with a bowl of thick vegetable soup or chilled buttermilk for a comforting meal.
For visual appeal,garnish slices with fresh herbs like thyme or chives.The dense crumb also holds up beautifully for hearty sandwiches or open-faced toasts topped with grilled mushrooms or roasted seasonal vegetables.
Nutritional details (Per Slice)
| Calories | Protein | Carbs | Fat |
|---|---|---|---|
| 180 | 5g | 36g | 3g |

For further reading about traditional bread fermentation methods, visit the King Arthur Baking Company.Also, explore our Artisanal Breads and Fermentation guide for more wild starter techniques.
Q&A
Salt-Rising Bread: Unlocking the Secrets of a Unique Loaf – Q&A
Q1: What exactly is salt-rising bread, and how does it differ from traditional yeast bread?
Salt-rising bread is a distinctive, old-fashioned loaf that rises without the use of commercial yeast. Instead, it relies on a unique bacterial fermentation process to leaven the dough. Unlike the light, airy crumb of typical yeast breads, salt-rising bread is known for its dense, slightly crumbly texture and rich, tangy flavor. Its rise is powered by bacteria such as Clostridium perfringens, which create gases that help the dough expand.
Q2: Why is it called “salt-rising” bread when salt is not primarily responsible for the rising?
The name is a bit of a past misnomer.Early bakers believed salt was involved in the rising process, due to the presence of a salt spring near where the bread originated. In reality, salt is used sparingly in the dough for flavor, but it does not cause the bread to rise. Rather, its the action of naturally occurring bacteria that creates the lift in the dough.
Q3: What makes the fermentation process of salt-rising bread so unique?
Unlike traditional yeast fermentation, salt-rising bread uses a starter that’s kept warm to encourage bacterial growth.The bacteria consume sugars and produce gases that cause the bread to rise. This process is more temperature-sensitive than yeast fermentation,often requiring a warm environment around 110°F (43°C) to thrive. The result is a loaf with an earthy aroma and a subtle tang reminiscent of some sourdough breads, but completely yeast-free.
Q4: How does the flavor profile of salt-rising bread stand out?
Salt-rising bread offers a savory, slightly tangy flavor with hints of sweetness and an almost cheesy undertone. It has a complex, robust taste that can be surprising to those accustomed to more neutral white or wheat breads. The texture complements the flavor, providing a firm yet tender crumb and a golden, slightly caramelized crust.Q5: is salt-rising bread arduous to make at home?
patience and attention to temperature are key when making salt-rising bread, but it’s not overly difficult. The preparation starts with creating a starter, often called the “starter batter,” that requires warmth and monitoring for several hours to encourage the right bacterial activity. Once the starter is bubbly and aromatic, it’s mixed with flour and salt to form a dough that’s shaped and baked. Bakers who enjoy a hands-on, old-world baking experience often find salt-rising bread rewarding and intriguing.
Q6: What ingredients are essential to the salt-rising bread starter?
The starter typically includes cornmeal or flour, warm milk or water, baking soda, and sometimes a bit of sugar or potato to fuel the bacteria. No commercial yeast is used. the warmth of the mixture encourages the growth of naturally occurring bacteria that create the rise. Careful hygiene and timing help ensure the right bacteria flourish while keeping harmful bacteria at bay.
Q7: Can people with yeast sensitivities enjoy salt-rising bread?
Yes! As salt-rising bread doesn’t contain any yeast, it can be a good choice for those who are sensitive or allergic to baker’s yeast. The unique fermentation process means you can still enjoy a flavorful, well-risen loaf without yeast.Q8: Are there traditional regions or cultures where salt-rising bread originated?
Salt-rising bread has roots in American pioneer history, especially in the Appalachian region and parts of the Ohio River Valley, where yeast was scarce and bakers had to rely on natural fermentation. Over time, it became a beloved regional specialty passed down through generations.
Q9: How long does salt-rising bread keep once baked?
As of its dense crumb and natural fermentation, salt-rising bread tends to stay fresh for several days when properly wrapped at room temperature. It can also be toasted or warmed up to refresh the texture and flavor.
Q10: What are some tasty ways to enjoy salt-rising bread?
Salt-rising bread’s hearty texture and tangy flavor make it excellent for sandwiches, especially paired with sharp cheeses, roasted vegetables, or hearty spreads. It also shines toasted with butter or honey and is delightful alongside a warm bowl of soup or stew,adding a rustic charm to any meal.
Unlocking the secrets of salt-rising bread reveals more than just a recipe-it offers a window into traditional baking alchemy and a flavorful alternative to yeast-based loaves. For the adventurous baker, it’s a historic and delicious journey worth exploring.
To Wrap It Up
As we peel back the layers of salt-rising bread’s mysterious history and distinctive flavor, it becomes clear that this humble loaf is much more than a curious culinary relic. It’s a testament to the ingenuity of early bakers who harnessed natural fermentation without commercial yeast, crafting a bread that defies convention with its pungent aroma and golden crumb. Whether you’re an adventurous baker seeking to unlock ancient techniques or simply a bread lover eager to expand your palate, salt-rising bread invites you to embrace a slice of tradition steeped in science and folklore.So, the next time you knead, ferment, and bake, remember the quiet magic bubbling beneath this unique loaf-and savor a taste that’s truly one of a kind.